
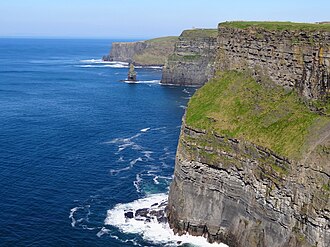
The Cliffs of Moher are a photographer’s dream for wide, dramatic panoramas: sweeping sea and sky, sheer rock faces, and ever-changing Atlantic light. This guide offers practical, visitor-focused composition ideas for Cliffs of Moher panoramas — from choosing safe viewpoints and framing techniques to stitching methods and on-site planning — so you can return home with images that convey scale, depth and mood.
Book your Cliffs of Moher tour to secure guided access, local insight and convenient transport options that help you reach the best panoramic viewpoints with less guesswork.
Photography composition ideas for Cliffs of Moher panoramas — Visitor tips
Why the Cliffs make great panoramas — what to look for and photographic goals
The Cliffs present a unique mix of vertical drama and horizontal sweep. When composing a panorama here, decide on the story you want to tell: vastness of sea, geological texture of the cliff face, dramatic sky, or human relationship to the landscape. Look for contrasts—rock against water, light patches on the cliff face, seabirds in flight—and aim to capture a progression from foreground to horizon that leads the viewer through the scene.
Picking a visitor-friendly viewpoint — choosing height, angle and safe access
Viewpoint choice changes everything. Higher viewpoints along the official walkways give broad horizontal sweep; lower terraces emphasize the cliff edge and vertical drop. For tourists and tour groups, guided stops often pick viewpoints that balance drama with safety and crowd management. If you’re travelling independently, stick to designated paths and viewing platforms and be aware that access and open areas can change—check current information before you go.
If your visit includes Doolin or boat-based perspectives, you can combine cliff-top and sea-level panoramas for variety. Plan a short walk in Doolin and consider local highlights like Aran Islands folk music & storytelling for a fuller day trip experience, or read Doolin Visitor Essentials for services and facilities around the area.
Framing and composition basics for wide scenes
Wide panoramas benefit from clear foreground, midground and background layering. Use a nearby rock, fencepost or patch of grass as a foreground anchor to add interest and guide the eye. Midground elements—small headlands, sea stacks or a curve of the cliff—provide the main subject, while the distant horizon and sky form the background.
Leading lines work well here: paths, the curve of the cliff, or lines created by rock strata can draw the viewer through your panorama. When composing, think in thirds: place the horizon on the top or bottom third depending on whether the sky or land is more compelling.
Creating depth and scale in a panorama
Depth comes from layering and atmospheric cues. Use overlapping elements—grass, cliff lip, distant headland—to create steps into the image. Scale is crucial at the Cliffs of Moher because the vertical drop can be hard to convey in a single wide frame.
Including people, sheep, or small boats in the midground or near the edge is an easy and authentic way to indicate size. If you’re working with tour groups, position a subject near the cliff edge (safely and on designated paths) to emphasize height. Natural features such as the jagged cliff face, sea stacks, and the curve of the coastline also provide cues that help viewers understand scale.
Panorama techniques: wide lenses, stitched images and smartphone panoramas
There are three practical ways to capture panoramas at the Cliffs:
- Wide-angle single shot: Use a wide or ultra-wide lens to include as much as possible in one exposure. This is fast and useful when light changes quickly, but extreme wide angles can introduce distortion at the edges.
- Stitched panoramas: Capture a sequence of overlapping frames on a level horizon and stitch them in software for higher resolution and minimal distortion. Use consistent exposure settings and overlap frames by about 25–40% for reliable stitching results.
- Smartphone panoramas: Modern phones do a great job if you pan slowly, keep the camera level, and avoid moving subjects. For best results, lock exposure and tap to focus before starting the panorama sweep.
Practical steps for stitched images: set your camera to manual exposure to avoid exposure shifts between frames; lock focus; keep the camera as level as possible; maintain consistent overlap; and shoot from a single pivot point (use a simple pano head or mark the tripod footprint). For handheld stitched attempts, steady movement and consistent pace are the keys to clean seams.
Working with light and weather — best times and how to adapt
Light and weather define the mood at the Cliffs. Golden hours (shortly after sunrise and before sunset) provide warm side-light that sculpts the cliff faces and adds texture. Overcast light is excellent for even detail and muted, moody panoramas. Stormy skies give dramatic contrast, but be prepared for rapidly changing conditions.
Adapt your composition depending on light: when the sun is low and hitting the cliffs, place the illuminated face as a primary midground subject; on flat light days, emphasise shapes and patterns in the rock and waves. Watch the sky: dramatic cloud formations can occupy two-thirds of your panorama for powerful results. Always check the forecast and remain flexible — weather can change quickly along the Atlantic coast.
Practical visitor tips: gear choices, stabilization and safety near edges
Gear choices should match your planned technique. A mid-range zoom (24–70mm) plus a wider option (16–35mm) covers most needs. For stitched panoramas, a sturdy tripod and a bubble-level or pano-head are helpful but not strictly necessary for casual visitors. Bring ND or graduated ND filters only if you’re shooting long exposures of the sea.
Tripods are allowed in most public areas but may be unwieldy on narrow paths or busy viewpoints. If shooting with a tripod near tours or crowds, be considerate and keep to designated areas. Handheld panoramas are perfectly acceptable—use image stabilization and higher shutter speeds when wind or foot traffic is a factor.
Safety is paramount. Never cross barriers or leave marked paths for a shot. Cliffs can be slippery, and gusts of wind are common. If you’re visiting with a tour, guides will often point out safe vantage points; consider timed group stops to avoid peak crowds and to get clear foregrounds for your shots. For more local visitor planning, see information on Doolin services and markets to combine a photography day with local food and culture.
Planning your visit: timing, tours and local connections
Align your timing with photographic goals. Sunrise and sunset require early starts or late finishes, while mid-morning or late afternoon suit tours and day trips. Booked tours can simplify logistics and often know quieter viewpoints and safe photo stops. If your itinerary includes nearby attractions, look at boat-based perspectives or island connections—Inis Oirr sea cliff walking route and Aran Islands experiences often pair well with a Cliffs visit.
Always check current access rules, weather forecasts and any photography restrictions before you head out. Conditions, access and permitted activities can change; verify official information to avoid surprises.
Book your Cliffs of Moher tour to reserve a guided stop with an experienced local guide who can suggest the best panoramic viewpoints for the conditions on the day.
If you’re organising a private or group photo trip, consider a private tour to tailor stops and timing around sunrise or sunset—see private and group tour options and contact details when planning specialised photography outings.
FAQ
What time of day is best for panoramic photos at the Cliffs of Moher?
Golden hours—shortly after sunrise and before sunset—are typically best for texture and warmth on the cliffs. Overcast days can also produce excellent panoramas with even light and rich mood. Choose based on the mood you want and be ready to adapt to rapidly changing weather.
Can I legally fly a drone to capture panoramas at the Cliffs of Moher?
Drone regulations and site-specific restrictions change. Do not assume drones are permitted. Check current official information and any local guidance before planning drone photography; respect wildlife and other visitors when operating any aerial device.
Do I need a tripod to shoot stitched panoramas or can I use a handheld smartphone?
A tripod and a level pivot point give the most consistent stitched results, but handheld panoramas are often effective—especially on modern smartphones with built-in stitching. For highest quality and straight horizons, a tripod and manual exposure/focus are recommended.
How can I show the scale of the cliffs in a wide panorama without obvious landmarks?
Include a small human figure, a group of visitors, a boat near the base, or nearby sheep as scale references. Layering foreground, midground and background elements also contributes to perceived depth and helps convey the cliffs’ immense scale.