
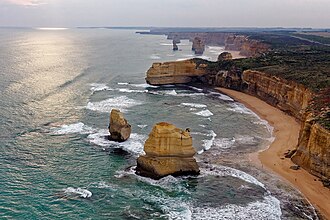
The Cliffs of Moher sea stacks guide: best viewpoints & photo tips offers practical, on-the-ground advice for visitors who want clear directions to the best cliff-top vantage points, reliable photographic techniques for capturing the stacks, and safety and wildlife considerations while exploring the cliffs. Sea stacks—isolated vertical rock pillars standing offshore where the ocean has eroded the cliff line—are dramatic subjects for landscape photography and a key reason many people travel to the Cliffs of Moher.
Book a guided Cliffs of Moher tour and plan your visit to get help timing your visit, reach quieter viewpoints and learn local safety guidance from experienced guides.
Top cliff-top viewpoints for sea-stack photos
There are several cliff-top areas along the official Cliffs of Moher route that are especially rewarding for sea-stack photography. Each spot offers different angles, scale and light, so your choice should match the mood and composition you want to create.
O’Brien’s Tower / Visitor Centre area
This central vantage gives classic wide views of the main sea stacks with the sweeping cliff line leading into the distance. It’s convenient for most visitors and works well for sunrise or late-afternoon light when the cliffs take on warm tones. Expect more people here; arrive early to secure a clear viewpoint.
Hag’s Head (southern end)
Hag’s Head is at the southern limit of the managed cliff walk and offers rugged foreground rock and a different silhouette of the stacks when viewed from an angle. It’s quieter than the visitor-centre area and can produce moody compositions, especially in onshore winds or with incoming weather.
North-west and Doolin-facing viewpoints
Walk north from the main complex toward the Doolin end for a longer, more open perspective. These vantage points deliver expansive panoramas of sea stacks with the coastal curve in the frame—great for wide-angle foreground interest and long exposures. For nearby walks and pet-friendly options, see the Pet-friendly walking areas in Doolin and the Burren guide, which includes access notes that may help if you’re bringing a dog.
Quieter alternatives and linked walks
If you want to move away from the busiest sections, consider exploring adjacent routes and viewpoints outside the immediate visitor hub. Local walking routes and art/landscape viewpoints give alternative frames and quieter shooting moments—see the Outdoor art and landscape viewpoint walk for ideas that extend a cliff-top visit into a broader coastal walk.
When to visit: time of day, season and weather considerations
Light and sea conditions are the biggest factors in how dramatic your images will look. The cliffs change rapidly with weather, so plan flexibly.
- Golden hour (sunrise and sunset): softer light, long shadows and warm tones—ideal for moody, layered compositions.
- Blue hour and night: silhouettes of stacks against twilight can create graphic images; use a tripod and long exposures.
- Cloudy or stormy days: heavy skies and churning seas can produce dramatic contrast and motion in the water—great for black-and-white or high-contrast color photos.
- Calm days: clearer horizons and reflective seas lend themselves to telephoto compression and color saturation.
Seasons matter for wildlife and access. Spring and summer bring nesting seabirds that may concentrate on cliff ledges; this can be a terrific wildlife photographic opportunity but may also mean restrictions or closures in certain areas. Check current official information and local notices about bird-nesting restrictions before planning a shoot.
Composition and gear tips for tourists
Bring a small, flexible kit rather than trying to carry everything. Focus on stability, framing options and exposure control.
Lenses and focal lengths
- Wide-angle (around 16–35mm full-frame equivalent): capture the cliff edge, foreground textures and the sea stacks together.
- Standard zoom (24–70mm): versatile for mid-range compositions and tighter scenes.
- Short telephoto (70–200mm): isolate a single stack, compress distance, pull distant details forward and compress waves for dramatic patterns.
Stability and exposure
- Use a compact tripod for long exposures or low-light situations. If hiking from Doolin or along extended cliffs, choose a lightweight carbon-fibre option.
- ND filters let you smooth sea surface motion on bright days; a polarizer reduces glare and deepens sky contrast.
- Bracket exposures for high-contrast scenes or use exposure blending/HDR in post-processing to retain cliff and sky detail.
Framing and creative ideas
- Include foreground elements—grasses, rocks or pathway sections—to create depth and scale.
- Use people or walking silhouettes for scale; place them near the cliff edge only if they are on the designated safe path.
- Experiment with negative space—open sky and sea can emphasize the isolation of the stacks.
- Try both vertical and horizontal formats: verticals emphasize height and grandeur; horizontals show the coastline curve and context.
Safety, access and responsible viewing
Your safety and the protection of wildlife and the landscape are paramount. The Cliffs of Moher are exposed and conditions can be hazardous.
- Stay on marked paths and behind barriers where they exist. Cliff edges are unstable and weather can change rapidly.
- Strong winds can make tripod use risky; weigh equipment down and keep a safe distance from edges.
- Respect birds and seals. Avoid getting between birds and nest sites, and never disturb breeding colonies. If you plan to photograph wildlife, keep a respectful distance and use a longer lens.
- If you’re bringing pets, keep them on leads and follow local guidance. See the Pet-friendly walking areas in Doolin and the Burren guide for nearby trails and tips.
- Access and permitted activities can change—check current official information and local signage before setting out.
Guided tours and photo-friendly options
A guided tour or small-group photography tour can add value in several ways: expert local knowledge of light and wind patterns, safer routes to quieter vantage points, and historical context that enriches your images. Guides can recommend the best times and angles for the stacks and may lead you to adjacent locations or additional viewpoints that are less obvious from the visitor centre.
For those who want a focused photography experience, consider booking a small-group or private photo tour to allow more time at prime viewpoints and personalized instruction. Book a guided Cliffs of Moher tour and plan your visit to explore specialized options and find a tour that suits photographers.
Simple photo-friendly visitor itineraries and short shot list
Choose an itinerary based on how much time you have and whether you want to include nearby attractions.
Quick visit — 2–3 hours
- Arrive before sunrise at the visitor centre to capture first light across the main stacks.
- Spend time at O’Brien’s Tower area for wide panoramas, then walk a short way north for alternate angles.
- Finish with a few telephoto shots of individual stacks as the light becomes more directional.
Half-day with a coastal walk — 4–6 hours
- Combine the central viewpoints with a walk toward Hag’s Head for variety in foreground and silhouette opportunities.
- Extend your visit by linking to nearby routes—consider combining cliff photography with the scenic coastal walk options or a stop at self-guided heritage points: see the Self-guided ruin stops between Doolin and the Burren guide for ideas.
Full-day coastal exploration
- Plan for sunrise at the cliffs, then travel to neighboring viewpoints and coastal beaches. If you’re making a day of it from Doolin, consider visiting quieter coastal spots and islands—see the Aran Islands quiet beaches & nature spots guide for complementary seaside photography.
- Look for sunset back at the cliffs or from a different angle for varied light and composition.
Short shot list for day-trippers
- Wide cliff panorama with leading edge foreground
- Long exposure smoothing the water around a single sea stack
- Telephoto compressed view isolating texture and layers
- Silhouette of a person on the path for scale
- Detail shots of cliff stratification and bird life (from a respectful distance)
If you want a tailored photo itinerary or are traveling with a small group, private tour options can be especially helpful—contact local operators for private or group bookings that prioritize photography time and access.
Book a guided Cliffs of Moher tour and plan your visit — ask about private or small-group photo tours to maximize shooting time, flexibility and expert local advice. For private-group inquiries, you can also request specialized arrangements during booking.
FAQ
Where are the best viewpoints for photographing the Cliffs of Moher sea stacks?
The most popular viewpoints are around the visitor centre and O’Brien’s Tower for classic panoramas, with Hag’s Head offering a quieter, more rugged angle. Walking north toward the Doolin-facing side yields expansive coastal curves and alternative frames. For less-trodden perspectives consider nearby coastal walks and linked routes; see local visitor guides for recommended paths.
What time of day or season gives the most dramatic photos of the sea stacks?
Sunrise and sunset generally produce the most dramatic light, with warm tones and long shadows. Cloudy or stormy days can also create dramatic skies and textured seas. Seasons affect bird activity and access—check current official information about wildlife and restrictions before planning a shoot.
Can visitors get down to the base of the sea stacks to shoot from sea level?
Access to the base of the cliffs and stacks is limited and can be dangerous. Some sea-level perspectives are only possible by boat or sea-based tour; on-foot access along the cliff base is typically unsafe and discouraged. Check current local guidance and consider a boat or guided tour if you want sea-level views.
Are drones allowed for photographing the sea stacks and surrounding wildlife?
Drone rules and permitted areas can change and are often restricted in protected and wildlife-sensitive locations. Because the cliffs host breeding seabirds and are a protected landscape, check current official regulations before using a drone and follow best-practice wildlife-disturbance guidance.