
Seasonal Light and Colour on Burren Limestone: A Photographers’ Guide for Cliffs of Moher Visitors
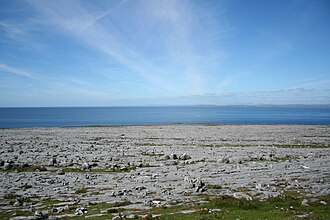
The Burren’s exposed limestone pavements, grikes and clints form a unique canvas for light and colour within sight of the Cliffs of Moher. This guide helps visitors and photographers time their trips to capture the best seasonal light and subtle hues of Burren limestone, offering practical tips on timing, composition, weather planning and respectful visiting so your images reflect this special landscape accurately and safely.
Plan your visit and book a Cliffs of Moher photo-friendly tour
Why Burren limestone near the Cliffs of Moher is special for photographers
The Burren is famous for its exposed karst limestone—flat pavements cut by deep grikes and scattered with blocky clints. Close to the Cliffs of Moher, this geology creates striking foregrounds, repeating textures and reflective surfaces after rain. The stone itself shifts from warm creamy tones to cool grey, depending on light, moisture and the surrounding vegetation, offering a wide tonal palette for landscape photographers.
Because the Burren sits near the Atlantic coast, light is often dramatic and varied. Low sun angles exaggerate textures, while diffused coastal light flattens contrast and emphasizes subtle colour shifts. Knowing how seasonal light and color on Burren limestone for photographers changes will help you choose when to visit, what to shoot and how to process images later.
Seasonal colour and texture: spring, summer, autumn and winter — what to expect
Spring
Spring brings a renewal of greens in the fissures and patches of bright wildflowers—gentians, orchids and rock roses—that create colourful counterpoints to the grey stone. Moisture from spring rains keeps the limestone clean and, on overcast days, the colours appear saturated without harsh shadows. Look for contrast between wet, darker grikes and dry clints to add texture.
Summer
Summer light is stronger and often warmer in the hours around sunrise and sunset. Dry limestone takes on a paler, creamier look, while hardy meadow grasses and flowering herbs provide warm accents. Midday can be harsh, so plan to shoot early or late. On hazy summer evenings the Atlantic light can create soft pastel skies that complement the limestone’s subtler tones.
Autumn
Autumn introduces richer, more saturated colours: russet grasses, deep greens and occasional golden light. Low sun angles lengthen shadows across the clints and grikes, enhancing three-dimensionality. After storms the stone may be wet and reflective, creating dramatic foreground interest for cliff-edge panoramas.
Winter
Winter is about mood. The limestone often appears cooler and more austere, with a narrower colour range. Low, slanting light on clear days produces strong textures and long shadows; stormy days offer contrast and dynamic skies. Snow is rare but, when present, can simplify compositions and highlight the Burren’s grid-like patterns.
Time of day across seasons: golden hour, blue hour, midday and low sun advantages
Golden hour—sunrise and sunset—remains the most reliable time to capture warmth and depth in the limestone, regardless of season. Low-angle light sculpts stone and vegetation, creating long shadows that emphasize the Burren’s patterning.
Blue hour (the period just before sunrise or after sunset) is ideal for cool, moody scenes where the limestone takes on a bluish cast and is balanced by residual sky colour. These times work especially well when photographing the Cliffs of Moher in the background so you can combine coastal panoramas with detailed foreground textures.
Midday sunlight can be unforgiving, flattening texture and blowing highlights. Use midday for macro shots in shaded grikes, or when you want evenly lit scenes for texture studies. When the sun is low in winter, take advantage of the long shadow play across the pavement.
Compositional approaches for limestone features and coastal panoramas
Start by identifying a strong foreground element—an evocative clint, a lichen-stained fissure or a band of wet stone—to lead the eye toward the cliffs or the sea. Use the Burren’s natural grid lines as leading lines; they guide viewers toward distant horizons and the Cliffs of Moher.
Mix wide-angle coastal panoramas with tight detail shots. A single trip can yield both: a 24–35mm lens for sweeping views that include the cliffs, and a 50–100mm for mid-telephoto framing and a macro or 100–200mm for compressing distant elements. Change perspectives: lie low to foreground grikes, or climb gentle rises for layered compositions that show the limestone, grasslands and cliffs together.
Pay attention to colour relationships—pale limestone against deep blue sea, or warm grasses juxtaposed with cool stone. Balanced colour contrasts often produce the most compelling images of seasonal light and color on Burren limestone for photographers.
Working with changeable weather and light: reading forecasts and staying flexible
Weather at the Cliffs of Moher and the Burren changes quickly. Check local weather forecasts and radar before you head out, but treat plans as flexible. Bring waterproof clothing, protective covers for equipment and a compact tripod for low-light or long-exposure work.
Cloud banks moving offshore often create short windows of dramatic light. If you see a break in cloud cover over the cliffs or limestone pavements, move quickly to capture the contrast. Conversely, if the light is flat, seek texture shots in grikes where subtle detail emerges without harsh shadow.
When planning, consider combining vantage points: walk easily between coastal connectors like the Lahinch to Doolin coastal connector to chase light along the shoreline and mix up backgrounds and perspectives.
Timing your visit: combining Burren viewpoints with Cliffs of Moher tours and day trips
If your priority is photography, schedule time around golden hour at both the Burren pavements and the Cliffs of Moher. Many visitors combine short walking routes and viewpoint stops; our coastal connector link offers scenic short-route ideas to stitch together multiple locations in a single outing.
Guided or photo-friendly tours often provide logistical support and local insight into the best vantage points and safe access. Check tour options and availability, and always verify current information before booking. For local orientation, the Doolin pocket map is handy for walking distances between harbour, pubs and B&Bs if you plan to base yourself nearby.
Practical on-site considerations: safety, access, permissions and respectful visiting
Respect protected areas and follow site guidance. Parts of the Burren and the Cliffs of Moher fall within coastal conservation protections; check current official information before entering sensitive zones. When shooting, avoid trampling fragile vegetation and do not remove stones or plant material.
Drone use, commercial shoots and access to some areas may be restricted. If you plan any professional work or drone photography, check permissions ahead of time. Stay a safe distance from cliff edges and review visitor safety guidance and emergency planning resources before you go.
Pack light, but include sturdy footwear for uneven pavement, a lens cloth for spray and rain, and spare batteries—cold and damp conditions drain power faster than usual. If you’re unfamiliar with the local layout, consult guides or join a guided tour to reduce the time spent finding suitable shooting positions.
Quick post-processing notes for bringing out limestone colour and contrast
In post, gentle clarity or texture adjustments can emphasize the grid-like structure without making images look over-processed. Local contrast and selective dodging/burning bring out the depth of grikes and clints. Use vibrance rather than saturation to boost subtle plant colours without shifting stone hues unnaturally.
When working with scenes shot in mixed light, create graduated or radial adjustments to balance sky and foreground. For wet stone, highlights can be clipped easily—use highlight recovery and midtone contrast to preserve detail. Always compare edits to a neutral reference so the limestone’s natural tones remain believable.
Respectful photography and planning checklist
- Check current site information and weather before travel.
- Pack waterproof protection for yourself and gear.
- Plan golden-hour windows but stay flexible for unexpected light.
- Follow conservation guidance; do not disturb habitat or move stones.
- Consider joining a local tour for access tips and safety advice.
For visitors who want guided, photo-focused experience, consider booking a tour tailored to photography needs. Plan your visit and book a Cliffs of Moher photo-friendly tour to ensure you get the best vantage points and timing advice from local guides.
If you prefer a private or group photography session, private and small-group tours are available to help you chase seasonal light and colour on Burren limestone with flexible timing and expert local insight. Book a private or group tour to discuss specific photographic objectives.
FAQ
When is the best season to photograph Burren limestone near the Cliffs of Moher?
There is no single “best” season—each offers different rewards. Spring emphasises floral accents and fresh greens; summer provides warm light and long evenings; autumn brings rich colours and dramatic light; winter delivers stark textures and mood. Choose based on the mood and palette you want, and always check current weather and conditions.
Can I combine photographing the Burren limestone with a Cliffs of Moher tour or day trip?
Yes. Combining viewpoints and short routes near the cliffs makes for efficient shoots, especially around sunrise or sunset. Consider guided or photo-friendly tours to maximize time and local knowledge. Use the Doolin pocket map and local connector routes to plan walking distances and logistics.
Are there any photography restrictions (for example drones or protected areas) I should know about?
Photography restrictions can vary; drone use and professional shoots may require permits, and some areas are protected for conservation. Check current official information and local guidance before your visit to ensure you comply with restrictions and protect sensitive habitats.
How do I cope with rapidly changing light and weather while trying to capture colour and texture?
Stay flexible, scout multiple nearby locations, and travel light so you can move quickly. Monitor forecasts and live conditions; pack waterproofs and spare batteries. Prioritise short windows of light for key shots and use cloud breaks or diffused conditions to capture subtle colour and texture in the limestone.